Posted on

Microbiology: Anaerobic GasPak system.

Anaerobic GasPak System (Cappuccino & Welsh, 2017).

Description. The GasPak is a sealed jar system that produces an anaerobic (non-reducing) environment for observing organism growth. Inside the jar, a foil package creates hydrogen and carbon dioxide when water is added. The palladium catalyst on the lid combines with any oxygen in the jar to form water. A methylene blue indicator strip inside the jar becomes colorless in the absence of oxygen (opening the jar and exposing this strip to free oxygen will turn it blue again). If bacterial growth is observed in the presence of air (as in standard tryptic soy agar cultures at 37°C in the incubator) and bacterial growth is observed using the GasPak system, then the bacteria may be classified as facultative anaerobe.

Clinical significance. It is important to know the oxygen requirements of an organism as this important fact can dictate different treatment protocols especially with deep wounds.

Summary of main steps. It is assumed that the reader knows aseptic technique and basic inoculation.

  1. Inoculate (single line streak) a tryptic soy agar plate with your bacterial culture.
  2. Place your TSA plate (upside down with lid on the bottom) inside the GasPak system.
  3. Add 10ml of water to the gas generator and seal the jar.
  4. Incubate the GasPak system at 37°C for 24-48 hours.

Reference

Cappuccino, J. G., & Welsh, C. (2018). Microbiology: A laboratory manual.

Posted on

Microbiology: Gram stain.

Gram Staining (Cappuccino & Welsh, 2017).

Description. Gram staining is a differential staining technique that differentiates bacteria based on their cell wall construction. Gram-positive bacteria have a thick peptidoglycan cell wall (stains purple) and its teichoic acid cross-linkages resist the decolorizing agent (Microbe Online, 2015). Gram-negative bacteria have a thin peptidoglycan cell wall which lies between two membranous layers (outer membrane and cell membrane, or in acid-fast bacteria the lipid layer and cell membrane) (Black & Black, 2015). This test helps to classify bacteria into two major categories: gram-negative and gram-positive.

Clinical significance. The Gram stain is the predominant differential stain—especially used in the clinical setting. It quickly assesses organisms that fall into one of two categories—Gram positive (purple) and Gram negative (pink/reddish).

Summary of main steps. It is assumed that the reader knows aseptic technique and how to heat fix.

  1. Inoculate clean slide. Use aseptic technique throughout. If using a broth culture, place 2-3 loopfuls of culture onto the glass slide. If using a solid medium, first place 2 loopfuls of deionized (DI) water onto the slide. Then place 1 loopful of culture into the DI water puddle on the slide (repeat if necessary). Spread the loopful of culture around on the slide in a circular pattern.
  2. Allow the slide to air dry. Then heat fix.
  3. Flood slide with crystal violet (primary stain, Hucker’s, stains all cells purple). Wait 1 minute.
  4. Flush gently with DI water.
  5. Flood slide with Gram’s iodine mordant (intensifies primary stain by binding to the primary stain and forming an insoluble complex, crystal-violet-iodine or CV-I). Gram’s iodine is also a killing agent. Wait 1 minute.
  6. Flush gently with DI water.
  7. Quickly and carefully (be stingy) cover the slide with 95% ethyl alcohol decolorizer (selectively removes color from cell components/structures). You should see some pale blue run-off. The decolorizer is a lipid solvent and also dehydrates protein.In Gram-negative cells, the decolorizer makes the cell wall more porous by dissolving the lipid components—aiding in the removal of the CV-I complex.In Gram-positive cells, the decolorizer makes the cell wall pores smaller—making the removal of CV-I more difficult (i.e. makes the CV-I “stick” better).
  8. Flush immediately with DI water.
  9. Flood slide with safranin (counterstain for contrast those structures that have been decolorized). Wait 45 seconds.
  10. Flood gently with DI water.
  11. Blot gently with bibulous paper.


Reference

Black, J. G., & Black, L. J. (2015). Microbiology: Principles and explorations (9th ed.). Hoboken, NJ: John Wiley & Sons.

Cappuccino, J. G., & Welsh, C. (2018). Microbiology: A laboratory manual.

Microbe Online. (2015, February 2). Gram staining: Principle, procedure and results. Retrieved from http://microbeonline.com/gram-staining-principle-procedure-results/

Posted on

Microbiology: Broth tube.

Inoculations

Broth tube (Cappuccino & Welsh, 2017). Using aseptic technique:

  1. Flame loop. Flame opening of broth culture.
  2. Dip loop into broth culture. Flame opening of broth culture.
  3. Open the sterile new broth tube. Flame opening of the sterile broth tube.
  4. Dip loop into the sterile broth and gently shake the loop inside the new broth.

Flame the opening of the new broth tube and replace cap. Flame loop.

Reference

Cappuccino, J. G., & Welsh, C. (2018). Microbiology: A laboratory manual.

Posted on

Microbiology: Slant tube.

Inoculations

Agar slant (Cappuccino & Welsh, 2017). Using aseptic technique:

  1. Flame loop. Flame opening of broth culture.
  2. Dip loop into broth culture. Flame opening of broth culture.
  3. Open the sterile slant. Flame opening of the sterile slant.
  4. Using the loop (which has been dipped into the broth culture), drag loop across the agar slant in a zig-zag pattern from the end (bottom) up to the opening.
  5. Flame opening of slant tube and replace the cap. Flame loop.

Reference

Cappuccino, J. G., & Welsh, C. (2018). Microbiology: A laboratory manual.

Posted on

Microbiology: Streak plates.

Inoculations

Streak plate (Cappuccino & Welsh, 2017). Refer to Figure 12. Using aseptic technique:

  1. Using a Sharpie marker, divide the plate into 4 quadrants labeled 1-4 clockwise.
  2. Flame transfer loop and cool. Place a loopful of broth culture in quadrant-1 by dragging the loop across the periphery (close to the edge of plate) in a tight
    zigzag pattern.
  3. Flame loop and cool. Turn plate 90° Touch the loop at one corner of quadrant-1 and drag across to quadrant-2 in a similarly tight zigzag pattern.
  4. Flame loop and cool. Turn plate 90° Touch the loop at one corner of quadrant-2 and drag across to quadrant-3 in a similarly tight zigzag pattern.
  5. Flame loop and cool. Turn plate 90° Touch the loop at one corner of quadrant-3 and drag across to quadrant-4 and up through the middle/center of the plate, carefully avoiding previously inoculated areas in quadrants 1-3.
  6. Remember to store plates upside down: tape the lid to the plate; store it with the lid on the bottom. This allows for any condensation to drip onto the lid instead of on the medium/culture itself.

Figure 12. Streak plate technique

Reference

Cappuccino, J. G., & Welsh, C. (2018). Microbiology: A laboratory manual.

Posted on

Microbiology Lab Media/Test Notes

Microbiology Lab Notes (media and tests) By ©2018 Shirley S. Chung, Green River Community College

Download these notes.

Thioglycollate Broth:

  • Test aerotolerance of bacteria.
  • Turns pink in presence of oxygen via Resazurin indicator. Alternatively, methylene blue indicator (colorless in an anaerobic environment and greenish-blue in the presence of oxygen).
  • Uniform growth = facultative anaerobic bacteria.
  • Bubbles = gas-producing bacteria.
  • Bottom growth = anaerobic bacteria.
  • Contains sodium thioglycollate, thioglycollic acid, L-cystine, methylene blue, and 0.05% agar.  The sodium thioglycollate, thioglycollic acid, and L-cystine reduce the oxygen to water.

http://www.austincc.edu/microbugz/fluid_thioglycollate_medium.php
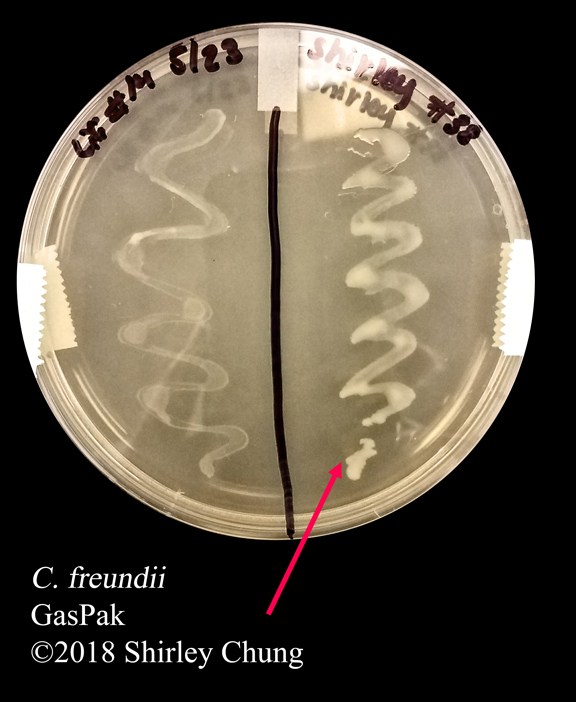
GasPak:

  • For incubation of anaerobic cultures in a nonreducing medium.
  • Generates water and CO2.
  • Methylene blue strip indicator is blue in presence of oxygen, and colorless in absence of oxygen.

Selective, Phenylethyl alcohol agar:

  • For isolation of most G+
  • Partially inhibitory to G- (may form, but stunted growth, suboptimal).
  • Inhibits E. coli, selects for S. aureus.

Selective, Crystal violet agar:

  • Selective for most G-
  • Inhibitory to most G+

Selective, 7.5% NaCl agar:

  • For halophilic
  • Inhibitory to most other non-halophilic organisms.
  • *Most useful in detection of genus Staphylococcus.

Differential/Selective, MacConkey agar:

  • Has bile salts and crystal violet, lactose, neutral red.
  • Inhibit G+
  • Selective for G-
  • Contains Lactose
  • Contains pH neutral red which differentiates RED-Lactose-fermenting colonies; translucent-non-fermenting colonies.
  • Differentiate between enteric bacteria.
  • Coliform bacili: lactose fermenters, make acid, RED color on their surface. coli is a super fermenter and there will be pink zone surrounding growth.
  • Dysentery, typhoid, paratyphoid: non-lactose fermenters; TAN appearance or transparent.

Differential/Selective, Mannitol salt agar (MSA):

  • High salt concentration, 7.5% NaCl
  • Select for staphylococci, inhibit most other non-halophilic bacteria.
  • Contains mannitol (carbohydrate) for differential (some staphylococci can ferment).
  • Phenol red indicator detect acid from mannitol-fermenting staphylococci.
  • Yellow zone around growth is positive for mannitol fermentation; no color change is negative.

Differential/Selective, Eosin-methylene blue agar (Levine):

  • Has lactose and dyes eosin and methylene blue.
  • Partly inhibitory to G+
  • Promote G-
  • Differentiate between enteric lactose fermenters and nonfermenters.
  • Can identify between E. coli (blue-black w/metallic green sheen due to lots of acid).
  • Can identify E. aerogenes (thick mucoid, pink colonies).
  • Enteric bacteria that do NOT ferment lactosecolorless colonies, transparent, and appear to take on purple color of medium.

Enriched Media, Blood agar:

  • For cultivation of fastidious organisms (e.g. Streptococcus).
  • Demonstrate hemolytic properties.
  • Gamma: no lysis of RBC. No change in medium.
  • Alpha: incomplete lysis of RBC; reduction of Hb to methemoblogin results in greenish halo around growth.
  • Beta: lysis of RBC; results in clear zone.

Starch Hydrolysis:

  • Extracellular enzyme amylase to hydrolyze starch down to maltose (maltase cat.) then glucose.
  • Starch agar.
  • Flood with iodine to test: blue-black = presence of starch and NEG for starch hydrolysis; clear zone (exoenzymes present) = POS for starch hydrolysis.

Lipid Hydrolysis:

  • Tributyrin agar.
  • After inoculation, CLEAR zone POS for lipid hydrolysis (lipase).

Casein Hydrolysis:

  • Milk agar to test for protein hydrolysis.
  • Clear zone = POS.

Gelatin Hydrolysis:

  • Test for liquifaction via gelatinase to hydrolyze protein to amino acids.
  • Gel deep tubes get inoculated.
  • After incubation, put in fridge for 30min. Cultures that remain liquified produce gelatinase and rapid gelatin hydrolysis (POS).
  • If solid, then re-incubate cultures for 5 more days. Put in fridge for 30min. If liquify, then they are POS for SLOW gelatin hydrolysis. If solid, then NEGATIVE.

Carbohydrate Fermentation:

  • *Facultative anaerobes are usu. the fermenters.
  • Need broth and Durham tube.
  • Observe w/in 48 hrs.
  • Add phenol red: red turns yellow = POS (no color change of indicator = NEG).
  • Gas = POS.
  • Beware that neg result does NOT mean no growth.

Hydrogen Sulfide:

  • 2 fermenting pathways to produce H2S (g).
  • Stab inoculation.
  • Black ferrous sulfide = POS.
  • Also indicate motility.
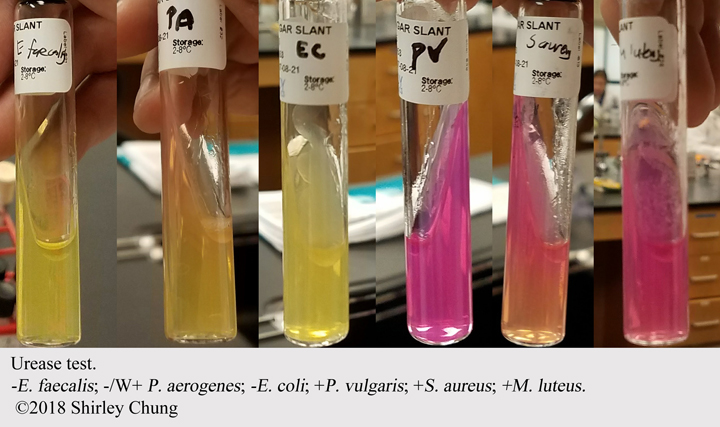
Urease:

  • Useful to i.d. Proteus vulgaris (produces urease). Other organisms also can produce urease.
  • Inoculate urea broth containing indicator phenol red.
  • Deep pink = POS urease presence. No deep pink = NEG.

Nitrate Reduction Test:

  • Reduction of nitrates by some aerobic/facultative anaerobic organisms occur in absence of oxygen. Use inorganic subtrates NO3 or SO4. Some can further reduce Nitrite to ammonia.
  • Solution A=sulfanilic acid. Solution B is alpha-naphthylamine.
  • Solution A+B = cherry red = POS for reducing nitrates to nitrites.
  • No red gives 2 possibilities: end products were reduced even further down to ammonia; or no reduction took place.
  • Add zinc. No color change = no nitrates = POS. Red color change = NEG = yes nitrates are present.

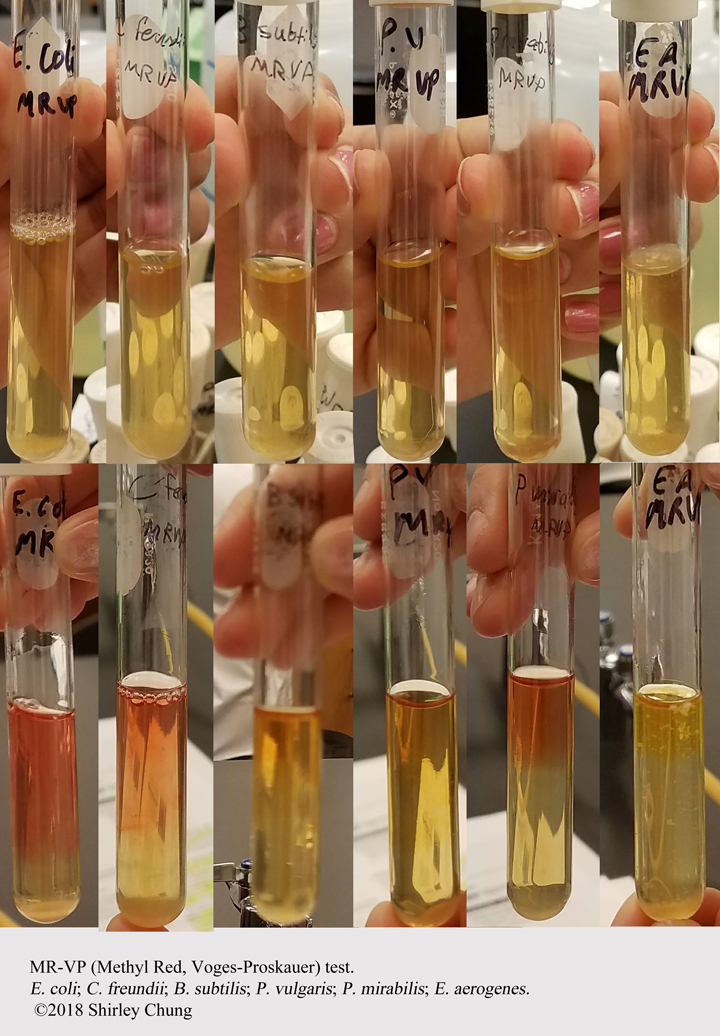
IMViC (Indole, Methyl red, Voges-Proskauer, Citrate utilization):

  • Identification of enteric bacteria.
  • Indole production.
    Some bacteria hydrolyze Trp to produce organic compound indole. Use SIM agar containing Trp. After incubation, add Kovac’s reagent.

    Turn CHERRY RED = POS for Trp hydrolization. No cherry red = NEG.

  • Methyl red.
    Determine if organism can ferment glucose via high-acid end-products. Differentiate between glucose-enterics (especially valuable to separate E. coli [low pH] and E. aerogenes [converts to nonacidic end products]).

    Low pH (<4.4) Methy red indicator turns RED = POS. pH > 6.2 turns YELLOW = NEG.

  • Voges-Proskauer.
    Determine if organism produces nonacidic/neutral end-products from organic acids from glucose metabolism…Glucose fermentation. Characteristic of E. aerogenes.

Barritt’s reagents A+B. Wait 15 min. Rose color = POS (for glucose fermentation). No pink rose color = NEG.

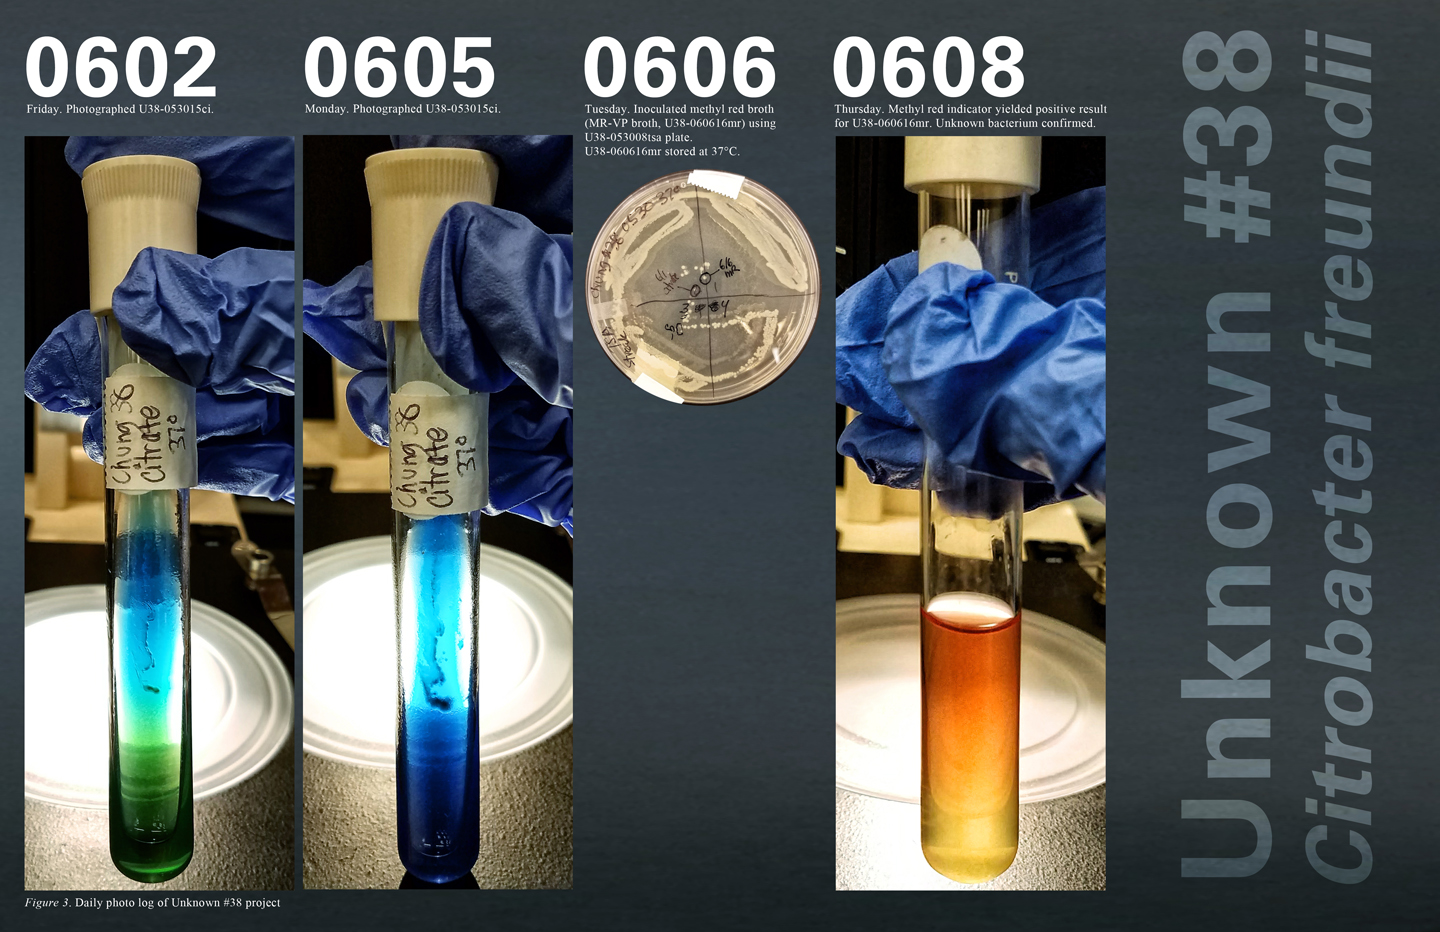
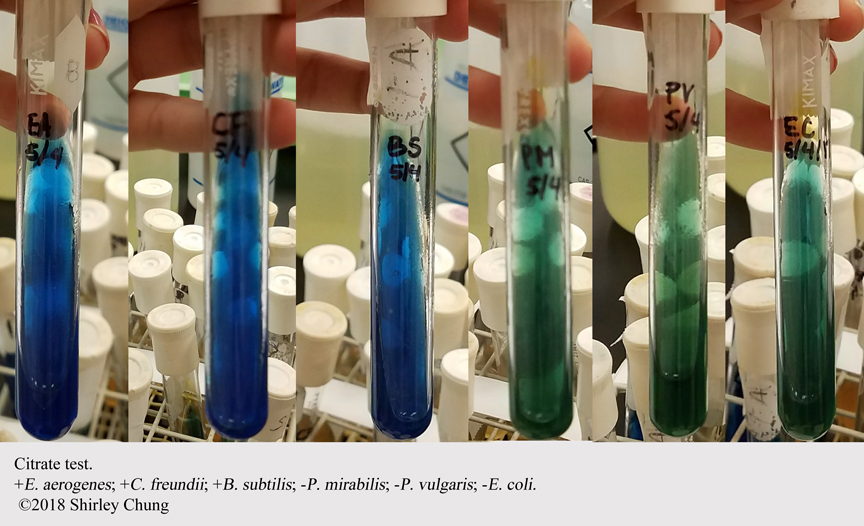
  • Citrate Utilization.
    Differentiate enteric organisms ability to use citrate as sole source of carbon.
    Growth, blue medium = POS for citrate. Green, no growth = NEG for citrate.

Catalase:

  • Aerobic respiration, hydrogen peroxide and superoxides are produced. Capable of producing catalase or superoxide dismutase.
  • Strict anaerobes don’t produce these enzymes.
  • Differentiate catalase-positive Staphylococci and catalase-negative Streptococci and members of Enterobacteria.
  • Inoculate on TSA slant/plate.
  • Add H2O2 (hydrogen peroxide). Bubbles = POS for catalase. No bubbles = NEG = strict anaerobe.

Oxidase:

  • Aerobic bacteria and some facultative exhibit oxidase activity.
  • Differentiate between Neisseria and Pseudomonas (both oxidase-positive) and Enterobacteria (oxidase-negative).
  • Test reagent alpha-aminodimethylaniline.
  • Pink then maroon then dark purple = POS for cytochrome oxidase production.
  • No color change or light pink = NEG.


Microbiology Lab Procedure Notes By ©2018 Shirley S. Chung, Green River Community College

Posted on

Microbiology: Unknown Project Tips 2, photo documentation.

How to succeed in your microbiology unknown project, part 2.

I cannot stress photo-documentation enough. You don’t need a fancy camera; your cell phone can do it!! Photograph slides under a compound microscope and photograph your specimens under the dissecting scope as well.

Notate (if possible) the magnification. What I do is write the magnification (and any other relevant details) on a scratch paper. Then I photograph the written notes followed by photographing the specimen. If I change the magnification, then I write that down, photograph that, followed by photographing the specimen at the new magnification. Using this workflow, I never lose track of what I am photographing. This technique works well even beyond your microbiology class!

Here are some examples of photo-documentation from my Unknown Project.