Mask Design 8 starts with the principles of Mask Design 7. Watch the Mask Design 7 video below.
Design 8 is a 3-ply quilter’s cotton (tightly woven cotton) with no filter pocket. Earlier in the pandemic, we were experimenting with home-crafted designs and filter materials. Now, it is possible to simplify and just make sure the mask is snug and well-fitted. We use the adjustable ear-loop elastics
This instructional is for a home-sewn fabric face mask with a filter pocket. I’ve found that people like different types of attachment (e.g. elastic, ties, etc.). I’m leaving the “how to attach to your face” out because the comfort-value varies so greatly. For myself, I’ve used guyline and cordlocks. DO make sure your attachment is quick, easy-on-easy-off, and doesn’t get tangled in your hair. You don’t want to contaminate everything.
The choice of filter-insert is also up to you. Check out the references section at the bottom of the page. When you Google for filter materials, beware of HEPA bags/filters and Filtrete filters because they are not guaranteed to be safe to breathe through (e.g. might have chemicals or fiberglass fibers).
This is my 6th mask design. My criteria was: easy to sew on a machine or by hand; have a filter pocket; no elastics because at the time of this posting, all elastics are sold out online; be versatile; be durable.
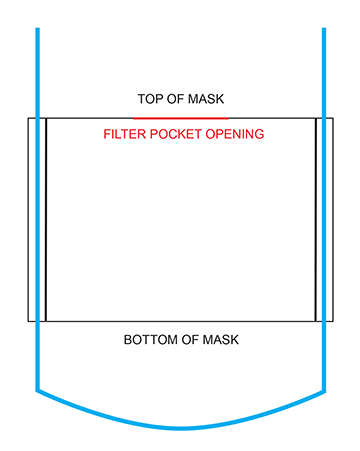
Download the mask templates. Print and cut out the templates. I suggest you transfer the templates onto a thin cardboard. I just used manila folders. Tape the right and left halves along the midline (blue color).
Printing tip: Be sure to print the PDF “at actual size”. Don’t “shrink” or “print to fit media” because that alters the actual size. Use the 1×1” square as a reference to make sure the print is to the correct scale.
Step 2.
Use the template and cut out two pieces of fabric. You should have two rectangles.
Step 3.
Along the long side, fold the “A” edge down to meet the “B” line. That should create a 1 cm fold-over along the top-long-edge of the rectangle and also along the bottom-long-edge of the rectangle. Pin and iron this foldover. It is crucial that you iron it down to make sewing easier. I didn’t have an iron so I just used my hair flat-iron. You can also use a heated frying pan or pot as an iron. Sew (with a machine or by hand) these two top and bottom “hems”. You should have top and bottom “finished edges” and left and right side “raw” edges.
Step 4.
Place the two pieces of fabric “right-sides” together (the “right sides” of the printed fabric facing each other). The wrong-sides of the fabric should be facing you (and if you flip it over you should also see a “wrong-side” of the fabric).
The filter pocket will be between the arrows in the pattern. That is the red color line segment from P1 to P0 to P1. DO NOT Sew along this [red] line. That needs to left open so that you can flip the fabric inside-out and also for a filter material (e.g. blue disposable shop towel) to be inserted if desired.
Leaving the red line open, sew along all the other edges. You can think of it as a pillow case. If you’re using a sewing machine remember to backstitch each time you start an edge to make the sewing secure.
Tip: I’m a novice on the sewing machine. Along the short-sides of the rectangle, I used a ruler to draw a 1 cm margin which is [sight] line C in the pattern. I use that line to align to the foot of the sewing machine so that I could sew straight. However, do not sew ON the C-line. If that helps you, go ahead and do it.
Step 5.
Using the filter opening (red line in the pattern), flip the mask inside-out. If you’re using a patterned fabric, you should now see the “right” sides of the pattern. Iron this rectangle down.
Step 6.
Now we are making the cord pockets along the short sides of the rectangle (e.g. the left and right edges). Fold the right edge toward the midline to create a 1.5-2.0 cm fold-over. This will create a pocket so that you can run the cord (1.8-2.0 mm guyline reflective cord) through. If you are using a larger diameter cord, then you will need a larger pocket. Do the same thing to the left edge.
Step 7.
Measure 140 cm (55 inches) of cord. Heat seal the ends of the cord. Tape one end of the cord to fine crochet needle (e.g. or knitting needle). Thread the cord through as shown in the diagram below. When you’re finished, both ends of the cord should be on the side of the filter pocket; the “U” should be on the bottom side. Attach the cord lock and tie knots at the ends of your cord.
Step 8.
You can create a nose-piece for a snug fit. I used sculpture wire but other materials are (not limited to): paper clips; twisty-ties (although the durability is questionable once you throw the mask in a couple of wash cycles); solid core copper wire (you’ll need to strip the vinyl casing); aluminum prongs from file-folders. Whatever metal you use, you can sew it into the lip of the filter pocket (see my video).
With my novice sewing skills (I literally just bought a novice machine off Amazon for $87, Brother XM2701), I just couldn’t manage sewing “on a curve”. That is, I lack the hand-eye-foot coordination to sew along the curve of the Olson pattern.
I’ve created a pattern that just has straight lines (reduces the learning curve for sewing curved shapes on the sewing machine) for those of you who may be new to sewing, like me. Follow the same written instructions from the Olson mask.
No elastics?! Yeah…It is nearly impossible to get any until mid-May or June. Use piping, bias tape, ribbon, shoes laces, etc. We’re going to have to go old school where they used ties instead of elastic ear-loops.
Printing tip: Be sure to print the PDF “at actual size”. Don’t “shrink” or “print to fit media” because that alters the actual size. Use the 1×1” square as a reference to make sure the print is to the correct scale.
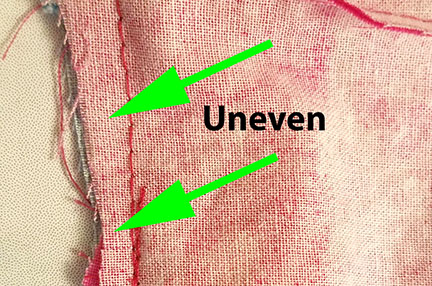
Iron! When the instructions tell you to fold the cloth over 1/4 inch, you can use a pin and an iron to make that edge flat before sewing. I don’t have a clothes iron, so I just used my hair flat iron. No hair flat iron? Just heat up a flat bottom pan/pot on the stove and press out the fabric that way. It is worth it to get the edge pressed BEFORE putting it through the sewing machine!!
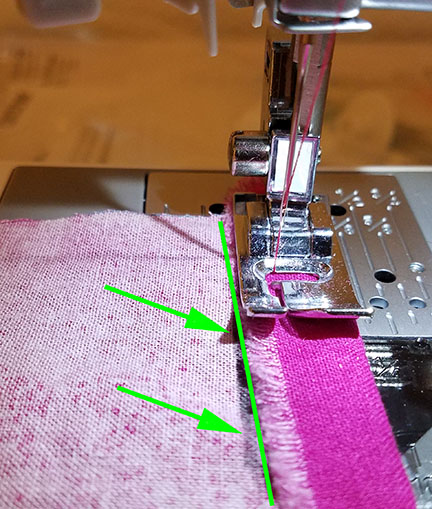
Key! I used a pencil to draw a line/edge so that I could use that as a sight reference to align the sewing machine foot. This way I can get a more consistent 1/4 fold sewn so that your sewing doesn’t look like you were sewing drunk! If you are not used to sewing, it’s kinda tricky to know exactly where that needle is going to fall. It is just like operating a band saw or scroll saw. Use your dominant eye to sight the line.
As a newbie, it’s difficult operating a sewing machine.
I’m sighting along the green line (pencil line to help me sew straight).
Each of the colored circles represents an aspect of life (e.g. career, family/friends/social). There are ten tick marks starting from the center (zero) to a colored circle. Reflect upon each area of life and use the tick marks to mark your fulfillment/satisfaction in that area of your life. Then connect your “dots”. What shape does it look like? Is your “life wheel” balanced (then it should look more like a circle)? Are there areas that you might want to improve in order to reach a greater sense of fulfillment/satisfaction? How might you start making small changes to achieve more meaningfulness—a greater sense of purpose?
Now here’s a blank “life wheel” (see PDF). You can use this exercise to help you map out any area of life or project or goal. The idea is that the colored circles represent a facet/dimension of something (e.g. life). Perhaps “school” is at the center of the wheel and each of the colored circles represent some aspect of school (e.g. clinical skills, anatomy, public speaking, etc.). Self-reflection can help you identify your strengths and areas for growth.
The 4.0 isn’t everything. It certainly isn’t the main thing I look for when recruiting interns.
It’s the “soft skills” that count more and will carry you further:
professionalism
work ethic
character
integrity
honesty
kindness
team-player
critical thinking
mental/emotional toughness
mental/emotional readiness
maturity
communication skills
bed-side manner (clinical)
proactivity (don’t wait to be “invited” to get something done)
attention to details
common sense
empathy
organization
public speaking
ability to teach (important in clinicals/healthcare school or MS or PhD)
etc.
Where do you stand? Make a scale of 1-5 (or whatever makes sense to you), and make a list of these “soft skills”. Remove yourself from your situation, and honestly appraise yourself in each of these areas. Don’t cut yourself down (extreme), and don’t feed your ego.
For those qualities that might be a bit low (you need to work on these), brainstorm 2-3 ways that you can work on and improve your “score”. What can you do right now? Work on one of these for the week, and these challenges will add up to your benefit.
When you ask for a letter of recommendation/reference, you don’t need an instructor to say you earned 4.0’s. You need the instructor to speak and attest to these soft skills. Starting a class (especially if you think that instructor will be instrumental to your reference list), make sure you stand out from the crowd. Make all these soft skills very obvious. You want the instructor to remember you by name several quarters later, and remember you by the person you are (which is NOT your grade).
Are you working on medical/healthcare school application essays? Me too! Here are some general tips.
Stay organized. Create a folder for each school. Create a checklist. Get the soft and hard deadlines on your calendar!
Transcripts. If you have a diverse educational history, make a list of all the schools you have attended. This is important if you’ve had some “bumpy” undergraduate years. Each application will need a set of transcripts, but get a set for yourself as well.
Check your classes. Start making a checklist of classes that meet the application’s requirements.
Request a transcript audit. Start your application process as early as possible. Ask the prospective school’s admissions advisor to audit your transcript(s) to make sure you’re meeting all the requirements (plus any new requirements the school may have added).
“Life Happens“. You will need to defend your life-choices; you will need to be accountable for how you’ve used your time and for the decisions you’ve made in all areas of life thus far. This is especially important if you’re a career-changer or an older student. Changes don’t have to be negative. You need to be able to tell people how “life” has shaped you, and what you’ve learned from all your experiences.
Be honest. I think it should be okay to admit, “Yeah I’ve screwed up a bit, but ______ experience has taught me ______.”
Never wait until the last minute.
We all dread essays. It takes you being honest with yourself and a lot of soul-searching. Don’t cut yourself down, yet don’t be an egomaniac either. Don’t make excuses. Own everything, good or bad. If you know students at your prospective school, ask them what essay questions they encountered.
Here are some links to help you with your essay writing: