DOWNLOAD Small-Medium Size Mask Design Here.
DOWNLOAD Medium-Large Size Mask Design Here.
This is my 6th mask design. My criteria was: easy to sew on a machine or by hand; have a filter pocket; no elastics because at the time of this posting, all elastics are sold out online; be versatile; be durable.
Step 1.
Download the mask templates. Print and cut out the templates. I suggest you transfer the templates onto a thin cardboard. I just used manila folders. Tape the right and left halves along the midline (blue color).
Printing tip: Be sure to print the PDF “at actual size”. Don’t “shrink” or “print to fit media” because that alters the actual size. Use the 1×1” square as a reference to make sure the print is to the correct scale.
Step 2.
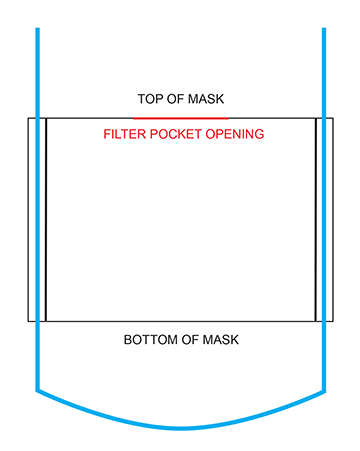
Use the template and cut out two pieces of fabric. You should have two rectangles.
Step 3.
Along the long side, fold the “A” edge down to meet the “B” line. That should create a 1 cm fold-over along the top-long-edge of the rectangle and also along the bottom-long-edge of the rectangle. Pin and iron this foldover. It is crucial that you iron it down to make sewing easier. I didn’t have an iron so I just used my hair flat-iron. You can also use a heated frying pan or pot as an iron. Sew (with a machine or by hand) these two top and bottom “hems”. You should have top and bottom “finished edges” and left and right side “raw” edges.
Step 4.
Place the two pieces of fabric “right-sides” together (the “right sides” of the printed fabric facing each other). The wrong-sides of the fabric should be facing you (and if you flip it over you should also see a “wrong-side” of the fabric).
The filter pocket will be between the arrows in the pattern. That is the red color line segment from P1 to P0 to P1. DO NOT Sew along this [red] line. That needs to left open so that you can flip the fabric inside-out and also for a filter material (e.g. blue disposable shop towel) to be inserted if desired.
Leaving the red line open, sew along all the other edges. You can think of it as a pillow case. If you’re using a sewing machine remember to backstitch each time you start an edge to make the sewing secure.
Tip: I’m a novice on the sewing machine. Along the short-sides of the rectangle, I used a ruler to draw a 1 cm margin which is [sight] line C in the pattern. I use that line to align to the foot of the sewing machine so that I could sew straight. However, do not sew ON the C-line. If that helps you, go ahead and do it.
Step 5.
Using the filter opening (red line in the pattern), flip the mask inside-out. If you’re using a patterned fabric, you should now see the “right” sides of the pattern. Iron this rectangle down.
Step 6.
Now we are making the cord pockets along the short sides of the rectangle (e.g. the left and right edges). Fold the right edge toward the midline to create a 1.5-2.0 cm fold-over. This will create a pocket so that you can run the cord (1.8-2.0 mm guyline reflective cord) through. If you are using a larger diameter cord, then you will need a larger pocket. Do the same thing to the left edge.
Step 7.
Measure 140 cm (55 inches) of cord. Heat seal the ends of the cord. Tape one end of the cord to fine crochet needle (e.g. or knitting needle). Thread the cord through as shown in the diagram below. When you’re finished, both ends of the cord should be on the side of the filter pocket; the “U” should be on the bottom side. Attach the cord lock and tie knots at the ends of your cord.
Step 8.
You can create a nose-piece for a snug fit. I used sculpture wire but other materials are (not limited to): paper clips; twisty-ties (although the durability is questionable once you throw the mask in a couple of wash cycles); solid core copper wire (you’ll need to strip the vinyl casing); aluminum prongs from file-folders. Whatever metal you use, you can sew it into the lip of the filter pocket (see my video).
References
